
Starlink Cloud - Workflows
Some of the most common Workflows in Starlink Cloud are explained below:
How To Create a New Service Account From Starlink Account Homepage
To create a Service Account from the Starlink Account Homepage, follow the below steps:
Open the Starlink account home page. Login with the valid Starlink account credentials.
Scroll down to the "Your Service Accounts" section.
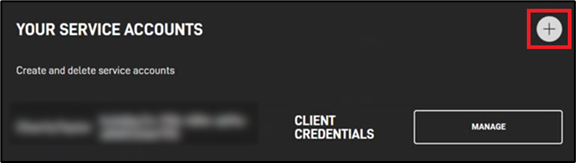
Starlink - Your Service Accounts
Select the "+" in the top right corner to create a new service account. The Create Service Account dialog box opens.

Create Service Account
If you do not see the section "Your Service Accounts" reach out to your Starlink account manager to inquire about access.
Fill in the following fields as applicable:
"Name" - Name for the service account
"Secret" - The secret for the service account that will be used for authentication
"Grant Type" - Select "Client Credentials".
Now that the service account is created, a system-generated client ID will populate. The client ID will be displayed in the "Your Service Accounts" section on the Starlink Account Homepage.
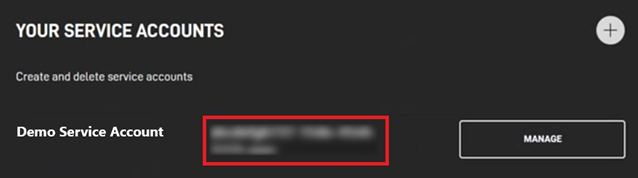
Client ID
This client ID can be used in combination with your client secret to request an authorization token to be able to call available API end points.
How to Link the Service Account To Kognitive Cloud
Login to the Kognitive Cloud using valid credentials.
Select the Starlink option from the left menu bar.
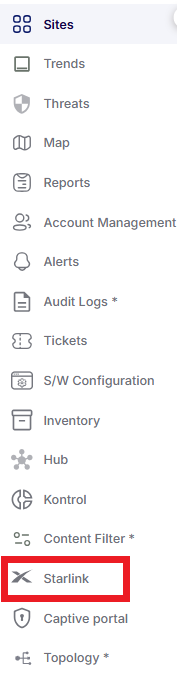
Starlink - Left menu bar
-20250327-073146.png?inst-v=fc2ec569-831b-4657-aec6-9d75d3f0693b)
Starlink Screen
Click the Service Account tab from the Starlink screen to open the Service Accounts screen.
Click Link Service Account to link a Starlink service account.
There are two methods to link a service account.
Service Account Client
Web Portal
-20250324-103018.png?inst-v=fc2ec569-831b-4657-aec6-9d75d3f0693b)
Service Account Tab
Method 1 - Service Account Client
If the User is a ‘reseller’ of Starlink services and/or has Starlink API Telemetry access, the User will be given a Client ID and Client Secret to gain access to the Starlink Cloud Telemetry API. Please reach out to Starlink directly for any API access detail issues.
To use the Starlink Account Client method, the user must first create a Service Account from the Starlink Account Homepage. Refer section How To Create a New Service Account From Starlink Account Homepage for more information.
After creating a service account, select the Service Account Client option.
Enter the Client ID generated while creating the Starlink service account.
Enter the Client Secret provided while creating the Starlink service account.
Click Add.
The system validates the user credentials and if the validation is successful, the user is directed to the next step – Associating Service Line to Sub-Organization. Refer to section How to Associate Service Line to Sub-Organization for more information.
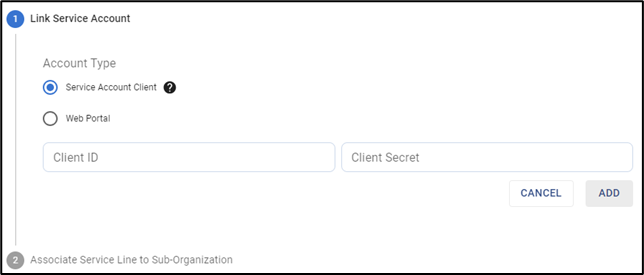
Add Service Account - Service Account Client
Method 2 - Web Portal
Select the Web Portal option.
Enter the registered Email Address of the Starlink Service Account.
Enter the Password.
Click Add. The user is directed to the next step – Associating Service Line to Sub-Organization. Refer to section How to Associate Service Line to Sub-Organization for more information.
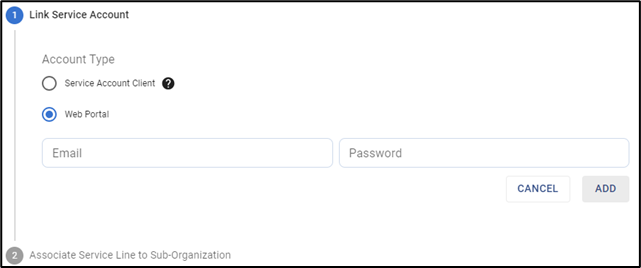
Add Service Account - Web Portal
Service Differences for Access Types
The Starlink Cloud Service has two methods by which Starlink Data can be accessed: Service Account Client and Web Portal.
Service Account Client
Service Account Client access is generally available to Starlink resellers to provide more complete metrics on terminal use, with data points on availability, latency, and throughput – among others. It requires API access to Starlink data through the internet, and the credentials must be added in Kognitive Cloud during account registration.
Web Portal
Web Portal access provides a limited amount of performance metrics but does show usage data. This metric is necessary for setting quota alerts on data usage.
The table below outlines the functionality provided for the two access methods.
Function | Service Account Client Method | Web Portal Method |
Online/Offline |  |  |
Usage |  |  |
Drop Rate |  |  |
Latency |  |  |
Throughput |  |  |
Obstruction or Alert Data |  |  |
Click the Question mark icon on the Dashboard to view the difference between the two methods.
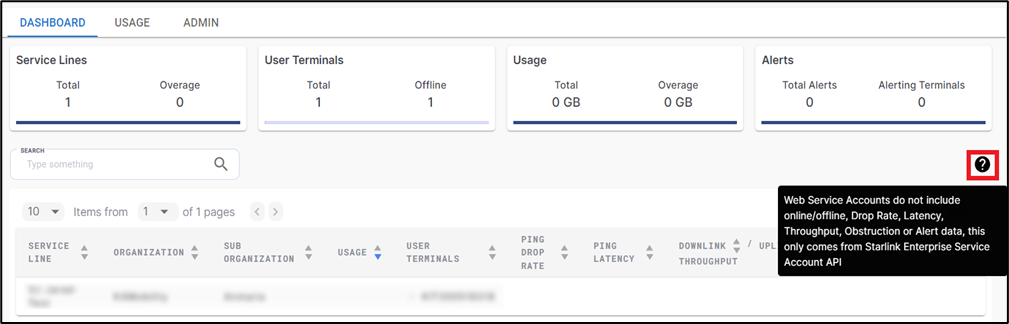
Difference between method 1 & 2
Any changes made to account or configuration information on Starlink may take up to 30 minutes to reflect in the Kognitive Cloud Portal.
How to Associate Service Line to Sub-Organization
Select the Service Line from the dropdown menu.
Select the Sub-Organization from the dropdown menu. The dropdown menu consists of all the available sub-organizations.
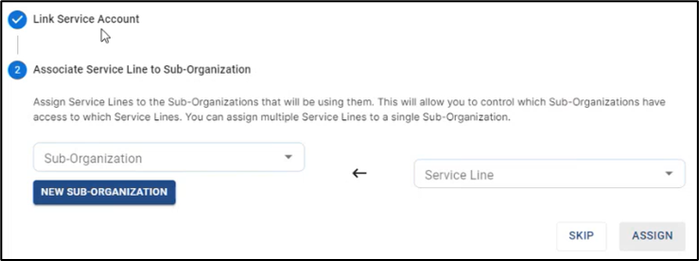
Associate Service Line to Sub-Organization
If the user wants to associate the Service Line to a new Sub-Organization, select New Sub-Organization button.
Select the Parent Organization from the dropdown menu.
Enter the new Sub-Organization name.

Create New Sub-Organization
Click Create button. The new Sub-Organization will be created.
In the Sub-Organization field, select the required Sub-Organization.
Click Assign to associate the Service Line with the selected Sub-Organization.
How to Create a Sub-pool or Plan
Click Plans tab from the Starlink screen to open the plans screen.
In the Organization field, select the Organization or sub-organization from the dropdown menu. The logged in admin Organization is populated by default here. This is the organization corresponding to the email ID used to login.
The dropdown list consists of all the sub-organizations under logged in admin organization.
In the Service Lines field, select the required services lines from the dropdown menu. The dropdown menu consists of all the service lines associated with the selected Organization and sub-organizations.
-20250324-074044.png?inst-v=fc2ec569-831b-4657-aec6-9d75d3f0693b)
Plans Tab
The Defined Pools & Plans section allows users to create & manage Pools and Plans.
Click the Create button under the Defined Pools & Plans section.
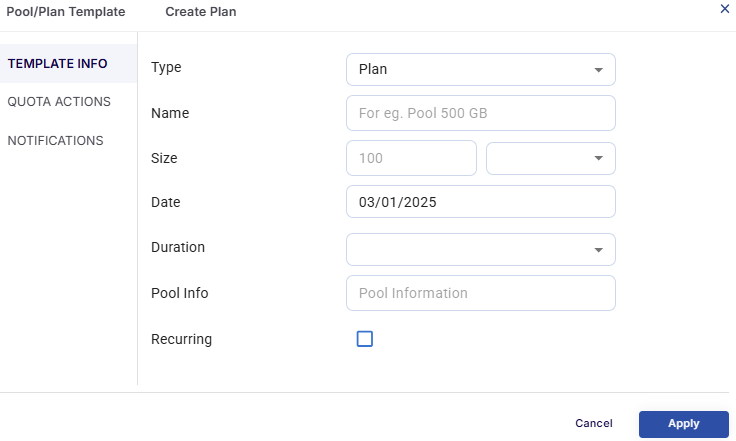
Create Pool/Plan
Template Info
The Template Info option from the side menu bar is selected by default.
In the Type field, select Pool to create a sub pool or select Plan to create a Plan.
Enter a Name for the pool/plan.
Enter the required Size and select the Unit (GB/TB).
Select the Duration for the pool/plan.
In the Pool Info field, enter a description for the pool.
Click the Recurring checkbox to renew the pool/plan according to the selected time period.
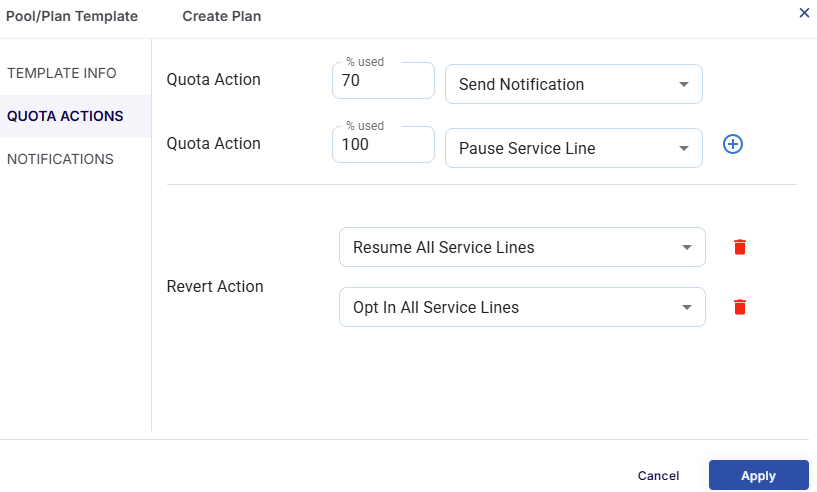
Quota Actions
Select the Quota Actions option from the side menu bar. The Quota Actions section can be used to specify the actions to be done when the data usage reaches a specific percentage of total quota of that respective pool/plan.
There are 3 types of actions that the user can configure.
The first action type is Send Notification - Using this option, the user can configure to send a notification about the data usage when the data usage reaches a specific percentage of the total quota of that pool/plan.
Quota Actions
In the % used field, enter the target percentage at which the notification should be sent.
Select Send Notification in the next field from the dropdown menu.
Select the
icon to add another action.
The second action type is Pause Service Line - Using this option, the user can configure all the service lines to pause internet connectivity.
In the % used field, enter the target percentage at which the service should pause all service lines.
Select Pause All Service Lines in the next field from the dropdown menu.
Now when the usage reaches the given percentage, the service will stop providing internet access.
Select the
The third action type is Mobile Priority (Opt Out) - Using this option, the user can configure all the service lines to opt out from using the priority data. When the site is located closer to the shore within a preset distance, the site uses standard data to access internet. When the site crosses this fixed distance and travels into the deep sea, it can access internet only using the Priority data. Using the Opt out all service lines action type, the user can configure to stop using the priority data for internet connectivity.
In the % used field, enter the target percentage at which the service should opt out from using priority data.
Select Mobile Priority (Opt Out) in the next field from the dropdown menu.
Now when the usage reaches the given percentage, the service will stop using the priority data for internet connectivity.
Using the Revert Action field, select the actions that should be taken when the plan renews for the next cycle based on the selected duration.
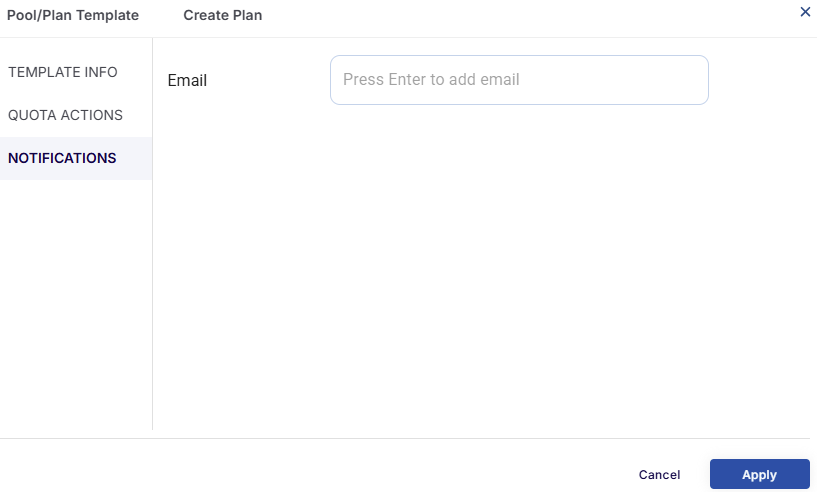
Notifications
Select the Notifications option from the side menu bar.
In the Email field, enter the email addresses to which the notification should be sent.
Notifications
Now when the usage reaches the specified percentage in the previous section, notifications will be sent to the given Email addresses stating details about the data consumption.
Click the Apply button to save the changes and create the pool/plan.
The created pools and plans will be listed under the Defined Pools & Plans section.
The table shows the following information:
Name - Name of the pool/plan
Type - The type of the entry (Pool/Standard Plan/Custom Plan)
Size - Data allocated for the Pool/Plan
Duration - Duration of the Pool/Plan
Assignments - Number of entities associated with the Pool/Plan.
How To Assign Plans/Pools to Service Lines
Click the Assign Service Line button to assign the created Plans or Pools to the Service Lines.
This button can also be used to change the pool or plans linked with the service lines when needed.
The Assign Service Line dialog box opens.
-20250417-122814.png?inst-v=fc2ec569-831b-4657-aec6-9d75d3f0693b)
Assign Service Line
Selecting Plans
The Plan Hierarchy section shows all the Pooled plans and the Standard plans created under the selected organization and number of Service line associated with each plan.
Select the first Pool/Plan from the Plan Hierarchy section.
The selected entry is highlighted in green.
The plan name appears at the top of the green "Select Plan" section in the center pane.
All Service Lines associated with the selected plan are displayed within this section.
-20250417-123136.png?inst-v=fc2ec569-831b-4657-aec6-9d75d3f0693b)
Select Plan
Select another Pool/Plan from the Plan Hierarchy section.
This entry is highlighted in blue.
The plan name appears at the top of the blue "Select Plan" section on the right pane.
Service Lines linked to this plan are shown in the blue section.
Moving Service Lines Between Plans
Once both plans are selected and their service lines are populated:
Select one or more service lines from either the green or blue panel.
Selected Service Lines are highlighted in green or blue, depending on their origin.
The number of selected service lines will be shown at the top of the section in the Selected Service Lines field. Hover the cursor on the number shown to view the name of the selected service lines.
Use the arrow buttons (
>or<) between the panels to move the selected service lines from one plan to the other.Service Lines can be moved in either direction using the respective icon.
-20250417-123755.png?inst-v=fc2ec569-831b-4657-aec6-9d75d3f0693b)
Select Service Lines
Click the Verify button to review and confirm the changes.
Once verified, apply the new Pool/Plan to the selected Service Lines.
This process can be repeated by choosing different plans from the Plan Hierarchy. The new selection will populate the green section, and the user can then select another plan to populate the blue section.