
Networks
To configure an Access network as Captive, the admin must first create the access network and associate it with an Interface in the Interfaces screen.
Log on to the OpenEdge System. The home page appears.
Select Interfaces from the side bar. The Interfaces will be selected by default.
Select the Add New Interface button to add a new Access Network.
-20250403-100848.png?inst-v=fc2ec569-831b-4657-aec6-9d75d3f0693b)
Interfaces Screen
Select the Add Connected Network button.
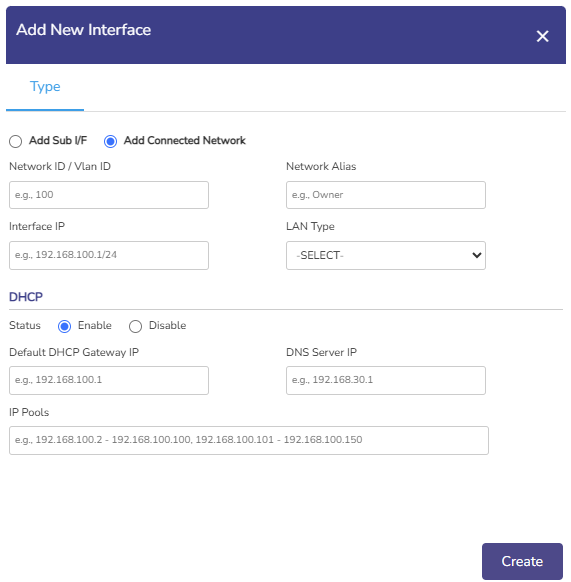
Add Connected Network
To enter data in the respective fields, see table below.
Fields | Description |
Network ID | Enter a unique numeric ID from 2 to 4090. Network ID is also known as a VLAN ID. Once the network ID is configured, user cannot modify or update the VLAN ID or network ID in the future. |
Network Alias | Enter a unique alias of the network. |
Interface IP | Enter an interface IP address and subnet mask. |
LAN Type | Select the LAN Type from the dropdown menu. |
DHCP Settings | |
Status | To enable DHCP so that a DHCP can automatically assign the IP address and the other allied configuration details to a host on a network to communicate with the endpoints, click Enable. |
Default DHCP Gateway IP | The default IP address becomes available. User can assign a new IP address. For this, click and delete the IP address and then assign a new IP address. |
DNS Server IP | The default IP address becomes available. User can assign a new IP address. For this, click and delete the IP address and then assign a new IP address. They can assign a maximum of three DNS IP addresses. |
To configure the DNS proxy, perform the following steps. Steps
By default, the status Not In Use is displayed. | |
To remove the DNS proxy, perform the following steps. Steps
Or,
The status Not in Use is displayed, see Figure Configure DNS Policy (Not in Use). | |
IP Pools | The default sequential range of the IP addresses becomes available. User can assign a new range of the sequential IP address. For this, click and delete the IP address range and then assign a new sequential range of the IP address. User can assign multiple sequential IP address range excluding the specific IP addresses of that range. This is an example. 192.168.10.2-192.168.10.100, 192.168.10.151-192.168.10.200, 192.168.10.220- 192.168.10.254 The following IP addresses will not be assigned to the device in the network.
DHCP will assign the IP address to a device on the specified network based on the IP address range. |
Click the Add Sub I/F button.
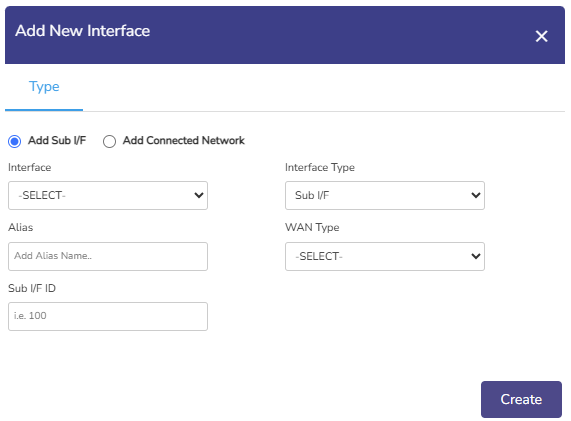
Add Sub I/F
Select the Interface from the dropdown menu.
Select the Interface Type.
Select the SSID.
Enter an Alias for the Interface.
Select the WAN Type.
Enter the Sub I/F ID.
Click the Create button to save the changes.
Select the Captive Access from the side bar. The Networks tab will be selected by default.
In the Select Access Network field, select the required Access Network from the dropdown menu.
Click the Confirm button to configure the access network as a Captive Access network.